How to Create a Google Play Account
ALL CLIENTS PLEASE NOTE: This is vital to the development process of your app. Until we receive Admin access to your Google Play Developer Account, we will not be able to send you a test build and won't be able to move forward with the development process.
If you are a new client, please refer to the steps below to set up a Google Play Developer Account and invite Aloompa as an Admin. If you are a returning client, it is strongly encouraged that you login to Google Play to ensure that your account is in good standing.
**NEW CLIENTS: You will be required to upload a driver's license as part of the verification process. This is REQUIRED. We will not be able to ship an app through your account without this completed.
STEP 1: Log out of all of your Google accounts. This will ensure that you are not creating an account for any of your other business or personal Gmail accounts.
STEP 2: Visit http://play.google.com/apps/publish and log in with the Google account you would like to create your Google Play account under. Clients typically use a universal company email instead of an individual's email.
Please note that this email will be used for all of your Google account and app communications, so it's important to choose an email that is checked frequently!
STEP 3: Select 'An organization' as the type of account to set up.

STEP 4: Continue through the steps and fill in the required information including your developer name, contact details, and website. When naming your account, it's important to give it a name that resonates with your brand and your event. This can often be used to find your app in the Google Play store. Notes: Developer Name will be the one that will show up to users and your Organization Name will be the legal name (they can be different).

STEP 5: Link your payments profile to verify your organization. This is required in order to set up a Google Play Developer Account.
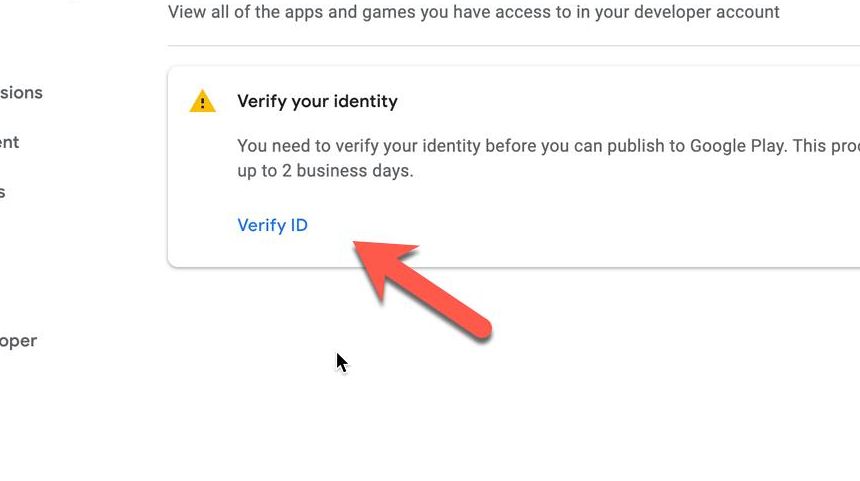
STEP 6: Verify your ID and organization. After paying, you will get a confirmation that your account is created. Next, in your Google Play Console, you will see an option to complete details to verify the account (see below). You will need to click on "Verify ID"
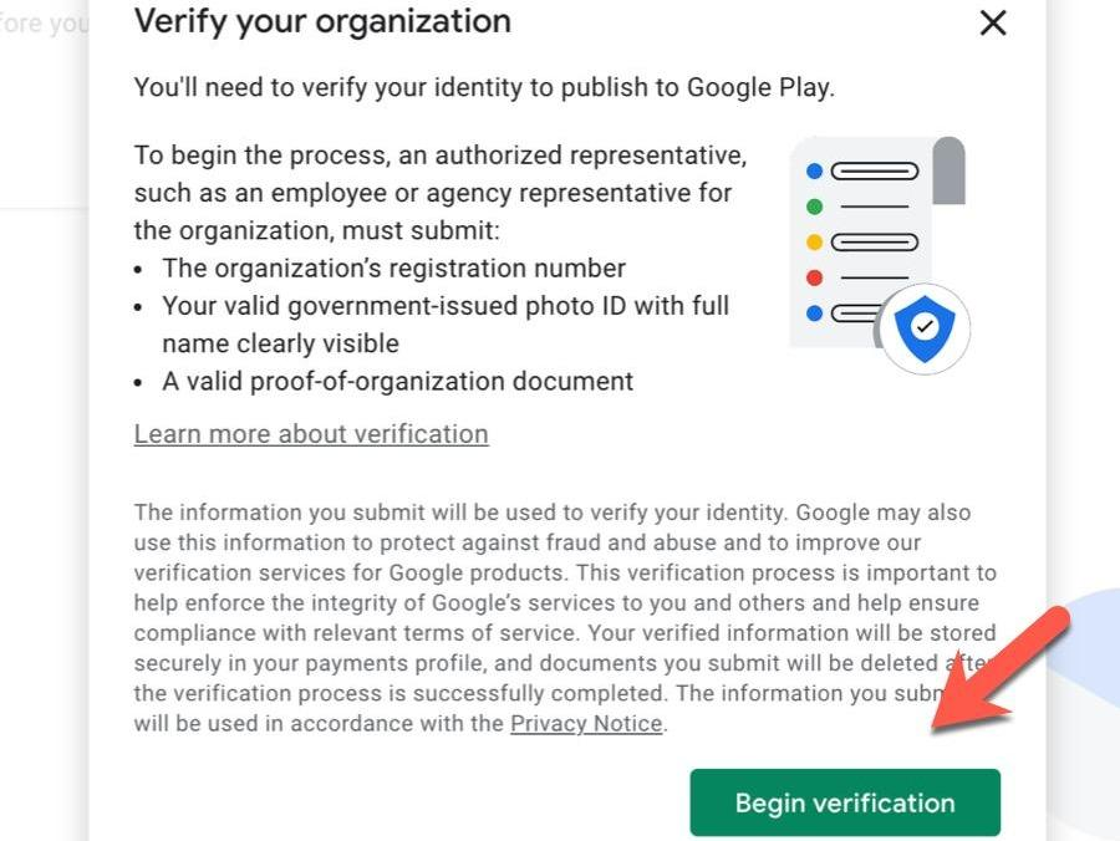
Here, you must upload organization documents to verify your account. You will need someone from the company that can submit the requested documents by clicking "Begin Verification". Documents can include personal identification (like a government issued ID), the D-U-N-S number of the company, etc.
STEP 7: Sign in to Google Search Console and verify your website. Click on Add Property and enter your website URL. Then, follow the verification methods provided (HTML file upload, DNS record, or Google Analytics). This guide from Google Play provides more specific guidance on verifying your website ownership. Once the website is registered in Search Console, return to the developer Console and click on "Verify Website" to send a verification request to your Search Console. Accept the request in Search Console to approve the verification.

STEP 8: Once you have completed the setup steps and you reach the Google Play Developer Dashboard, you can invite Aloompa as an admin by navigating to the Users and Permissions.

STEP 9: Click on 'Invite new users' to enter the information required for the Admin invite.

STEP 10: Complete the fields with the following information and send the invite.
- Email address - qa@aloompa.com
- Account permissions - Admin


From here, Aloompa will accept the invite and will be able to ship the Android app on your behalf. If you are curious on the status of your invite, please reach out to us at clientsupport@aloompa.com.