LiveOrder CMS Guide
The LiveOrder CMS is used to configure your store settings such as hours of operation, Categories, fees, templates for customer communication, and more. Before jumping into this guide, be sure to review our guide on Getting Started with LiveOrder to understand how this CMS fits into the LiveOrder picture.
LiveOrder CMS:
If you do not have an account please contact Client Support using the Support beacon or Contact link. If you have difficulty logging in, review How to sign in to LiveOrder.
We will start by reviewing the Settings screen, which you can access in the top right corner of your screen with the Settings button.

Settings: Exposition Settings
Note: All changes made in the LiveOrder CMS take approximately 5 minutes to display on your store as the CMS must sync with Square prior to displaying your changes.
Store Open:
Use this to toggle your overall store settings to Open or Closed. Note that closing the store overrides any set schedules.
Customers will see a "Coming soon" message if the store is closed either by this overall setting of Store Closed or if the customer is accessing the store outside of the programmed store hours. Scroll down to Store Messages for details on how to configure these messages and see an example.
Store Hours:
Selecting "Enable Custom Store Hours" will display a list of customizable store hours. You can set the days of the week and hours for when orders are allowed to be placed.

Store Categories:
Store Categories in the LiveOrder CMS map to a Square Location and Items also map Square Locations. On your storefront, after a user selects a Category they will see the Locations available to that Category. Once they select the Location they will see Items available at that Location.
LiveOrder Store Category --> Square Location --> Square Items
Consider how you want to group your items for sale, keeping in mind that a user can only purchase items from a single Location and a single Category in one transaction and that one Square Location cannot be assigned to more than one LiveOrder Category at a time.
Store Categories in the CMS:

Store Categories on your LiveOrder storefront:

Examples of how to use Store Categories:
- A location for Merchandise that is tied to a Store Category in the CMS called Merchandise and a location for Drinks that is tied to a Store Category called Drinks.
- If you are offering multiple pick up locations for the same items then you might have a location called Main Gate Merchandise and another called North Gate Merchandise that are both tied to a Store Category called Merchandise.
Users can only check out at a single location at a time and the Order Management screen that on-site employees will use can be set to their specific location as well. So, on-site planning will impact the setup of your LiveOrder store which is why we suggest tackling your on-site plan prior to entering any items. You will pair the Locations in your Square inventory to Categories in the LiveOrder CMS. You can have multiple locations sell from the same category - in the example provided with two separate merchandise booths this means those two locations would be paired with a single Category in LiveOrder called Merchandise. Or, if those two locations each have unique inventory you could have each Square Location matched with a single Category in the LiveOrder CMS. It all depends on what is going to happen on-site.
The Categories in Square are not used for organizing the display of your items for your store. Square Categories are only used for Alcohol & Limited Item messaging.
Edit a Category
To edit a Category, click on the name from your main Settings screen. This edit screen allows you to modify the following:
Category Name: Displays below the Category Image on the storefront.
Category Image: Displayed in the example above on the storefront.
Category Enabled: If you do not want customers to see this category, set this to No.
Donation Category: If this category is being used to collect donations, select Yes.
Store Fees: Adding a Percentage or Flat fee on the Category level will override processing fees set on the Settings screen.
Square Locations: This is where you will link your Square Locations to your Category in the CMS.
In Square go to Account & Settings - Locations - Select the Location. In your browser address bar copy the end of the URL. Enter this ID copied from the URL under Square Locations in the Square ID field. To add another location to this Store Category, click "Add a Square location" and repeat these steps, copying the ID from the end of the URL of the other Square Location. Keep in mind, one Square Location cannot be added to more than one LiveOrder Category at a time.
Save at the top of your screen and return to the main Exposition Settings screen.
Landing Page:
Please disregard this setting, it is not applicable to LiveOrder Order Ahead functionality.
Store Information:
Set the Store Timezone to the local time where your event is taking place. This is the Timezone that the Store Hours will follow.
Store Messages: Allow Delivery Selection
Select the "Allow Delivery Selection" box if you would like to request delivery details from customers during their checkout process. This is applicable if you will be shipping something to the customer.
For more details on the setup of this feature, please review our Ship To Home Setup Guide.
Store Messages: Alcohol Disclaimer
Input any disclaimer you would like to display to customers regarding purchases of alcoholic items.

For this text to display, the item must be programmed in Square with the Category of Alcohol.
Category Disclaimers
This field allows you to add messages to display to customers when they purchase any item within a specific category. Select the dropdown "Select a category...", pick the category and enter the desired message then click Add. Only one message is allowed per category. Below, we've added a message for the Merchandise category which can be edited by selecting the tool wheel to the right of the name.

The message will appear to the customer once they add the item in that category to their cart and select to continue to pay.

Coming Soon Title, Coming Soon Line 1, Coming Soon Line 2
These fields will display to the customer when they reach your LiveOrder storefront but the store is closed.

Information Collection Prompt


Order Submitted
Please disregard this setting, it is not applicable to LiveOrder Order Ahead functionality.
Landing Message
Please disregard this setting, it is not applicable to LiveOrder Order Ahead functionality.
Please disregard this setting, it is not applicable to LiveOrder Order Ahead functionality.
Enter LiveOrder Text
Please disregard this setting, it is not applicable to LiveOrder Order Ahead functionality.
Text Messages
The fields in the Text Messages section allow you to customize the communication your customers receive.
Order Confirmation Text offers a variety of parameters you can use to call out specific details to the customer such as their name, order number, items purchased, order total, pick up location, etc.
The Order Ready text is not functional at this time.
Please note that at this time, customers are only notified that their order was placed with the Order Confirmation Text/Email & Order Confirmation Email Subject. In the Order Management portal, you do have the option to select orders of similar status (pending / ready / fulfilled) to message them. You are able to customize that messaging directly in the Order Management portal.

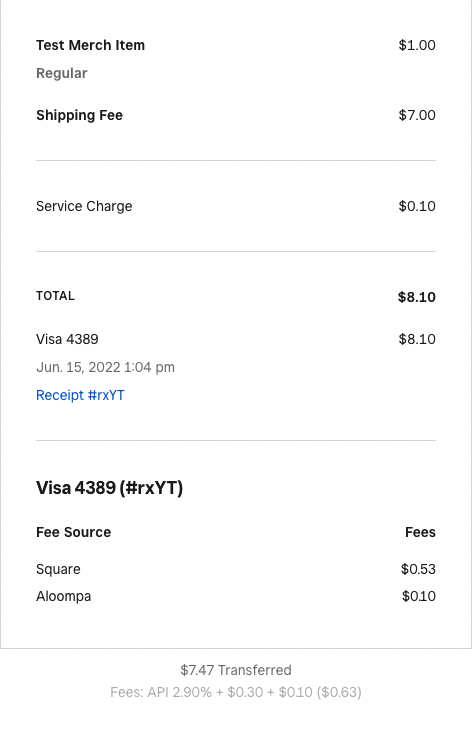
Below is an example of an email receipt (customers will only receive email receipts when they've entered their email address via the Ship to Home modal, otherwise they will receive this text on their mobile device):

Limited Items
The Limited Items section allows you to customize settings regarding items with restrictions for purchase.
For the Alcohol Limit to be enforced, the items must be programmed in Square with the Category of "Alcohol". The customer will not be able to cart more than 2 alcoholic items per order in the example above and will receive the message "Limit 2 alcoholic drinks per order" when attempting to cart over the number 2 on a single item or a combination of items.
For the Limited Item Limit to be enforced, you must set the Category in Square to "Limited Merchandise".

When the customer attempts to purchase over the limit for either alcohol or a limited item they will receive the limit message and will be restricted from continuing to the purchase page until they reduce the quantity they are attempting to purchase.

Store Fees
Add fees on top of the total order price with either a Percentage or Flat Processing Fee. The Percentage Fee Amount allows you to program in the percentage of the fee as well as a threshold. In the example below, the processing fee would be 10% of the order price up to $20.

We will add your agreed-upon Aloompa fee to the Store Fees. Please do not modify this fee.
We generally recommend including sales tax in the price the customer is paying. However, if you need to add sales tax on top of an item you will program those details in Square. Review their guide: Create and Manage Your Sales Tax Settings. You will create a Tax in Square and then add it to items in Square. The LiveOrder storefront will display this with a "Tax" line on the customer receipt. If you mark the tax as being inclusive (i.e. the tax should be bundled up with the price of the item, displaying only the total to the customer while allowing you to break out the tax in the Square backend), the "Tax" line will not be on the customer receipt.
Processing Fee Square Authorization:
Apply a global shipping fee to all locations with this field.
Square Integration
Aloompa will take care of this when we receive your Square account during the initial setup process. Please do not make changes to this section.
Airtable Integration
Please contact Client Support if you would like to integrate your account with Airtable.
Map Image
If you include an image in the Map Image field, it will display within each category prior to the user selecting the location they would like to order from (View Map icon in the image below) as well as in the email and text notification sent to the customer with their receipt. Only one map image per store can be used. We recommend using an overall event map with the pickup locations clearly indicated for the customer.

Privacy Policy and Terms of Service
SMS Disclaimer: Please disregard this setting, it is not applicable to LiveOrder Order Ahead functionality.
Purchase Disclaimer: This text displays to the customer on the Review Order screen below their items. In the image below, this field reads "All purchases are final."
Privacy Policy & Terms of Service: When text is entered in either of these fields, they will appear as hyperlinks under the Purchase Disclaimer. The customer can select either link and a modal will display at the bottom of their screen with the text you entered. In this example, we added a brief description and a link to read the full policy on our website.


Settings: User Management
 The User Management screen allows you to view any admins currently on your account and add users. Simply click Add Account, enter their email address, and add their account. This will add the user with the same level of rights you have as there is only one level of user credentials in the system. The user will receive an email from "Citizen" with a prompt to set their password. When you add a user to the system, we recommend you send them this article: How to sign in to LiveOrder.
Click "Manage" next to an existing user to remove them from the system or to resend their temporary password. The initial password sent by the system when you add a user will expire after a week so you might need to use "resend code" in the case that you add a user and they do not promptly accept the invitation and reset their own password.
Settings: Account Settings
This screen displays the email address you are currently logged in with. You are unable to modify your own password. Please contact Client Support for assistance if you need your password reset.